Submitted to Prof. Leng Phearun, Network Operating System
Deploying
Windows Using Windows Deployment Services (WDS)
Windows Deployment Services (WDS)
enables you to deploy Windows operating systems over the network, which means
that you do not have to install each operating system directly from a CD or
DVD. Here we are going to go step by step to deploy windows operating system
together with answer file and Sysprep in the same process. An Answer File is an
XML-based file that contains setting definitions and values to use during
Windows Setup. Sysprep is Microsoft's System Preparation Tool for Microsoft
Windows operating system deployment. Meaning that after completing this process
you will be able to deploy windows operating system with specific condition you
have set.
Suppose that you already install
Windows Server 2012. Then first thing you need to do is to log on to the server
running Windows Server 2012 by using an account with administrative privileges.
 |
| - |
Change your server
name
 |
| - |
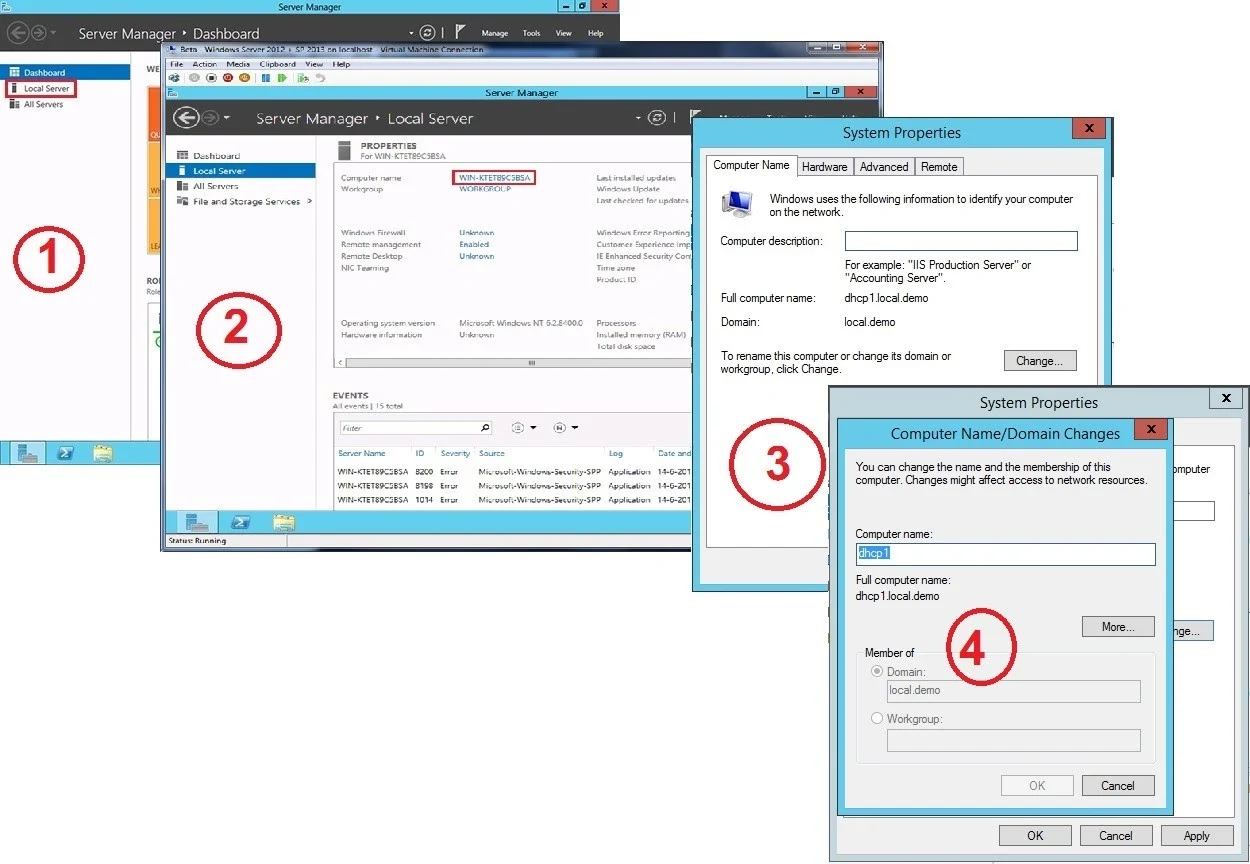
1.
Click on Local Server
2.
Find Computer Name, then click on it. System Properties
will appear.
3.
Fill in Computer Description box, then click
Change.
4.
On Computer Name/Domain Changes, fill in
Computer Name box and click OK.
5.
On System Properties, click OK. Server will
restart.
Set IP Static
 |
| - |
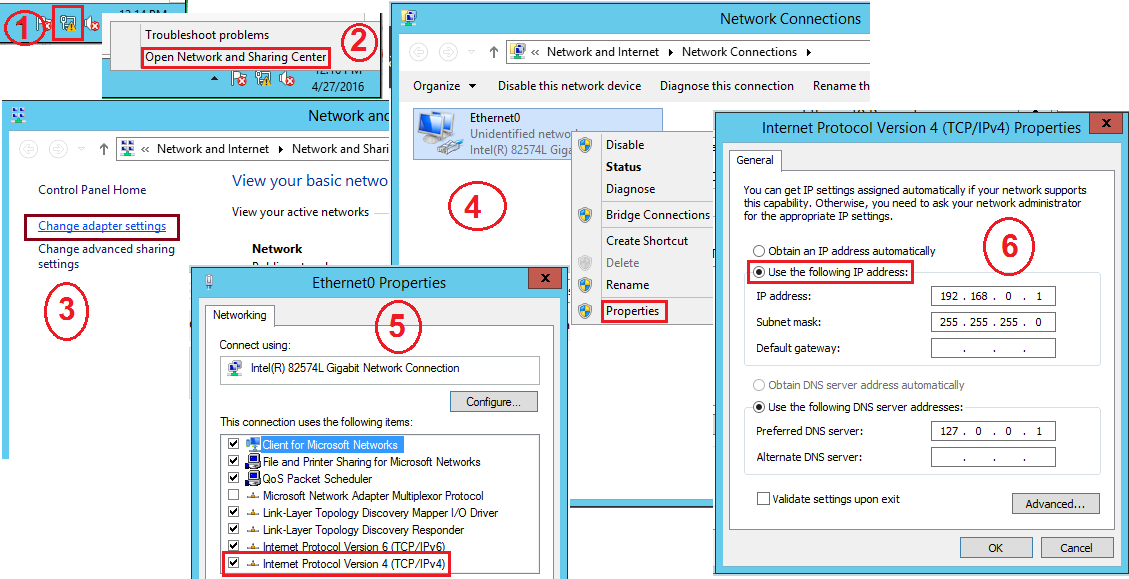
1.
Right click on Network Sign, then select Open
Network and Sharing Center.
2.
Click on Change Adapter Setting.
3.
Right click on Ethernet0, then select
Properties.
4.
Double click on Internet Protocol Version 4
(TCP/IPv4)
5.
Select Use the Following IP Address, then fill
out IP address (For example here, 192.168.0.1)
6.
Then click OK.
Add Roles
To deploy and configure WDS you
need to add the following roles:
1.
Active Directory Domain Services (AD DS).
A Windows Deployment Services server must be a member of an Active Directory
Domain Services (AD DS) domain or a domain controller for an AD DS domain.
2.
DNS. You must have a working Domain Name
System (DNS) server on the network before you can run Windows Deployment
Services.
3.
DHCP. You must have a working Dynamic
Host Configuration Protocol (DHCP) server with an active scope on the network
because Windows Deployment Services uses PXE, which relies on DHCP for IP
addressing.
4.
WDS. Deploy windows operating system.
Here we are going to add these 4
roles at the same time.
Make sure that you log on to the
server running Windows Server 2012 by using an account with administrative
privileges.
1.
Click on Manage, then select Add roles and
Features.
2.
Click Next 3 times. Then select the 4 role
mentioned above (AD DS, DNS, DHCP, and WDS). One by one, click Add Features.
3.
Click Next 7 times, then Click Install.
Configure each role
After the process above
completed, you will see on Notification sign that show you to configure roles
you have installed (Only 2 role you need to configure, AD DS and DHCP).
 |
| - |
First thing to configure is AD
DS
 |
| - |
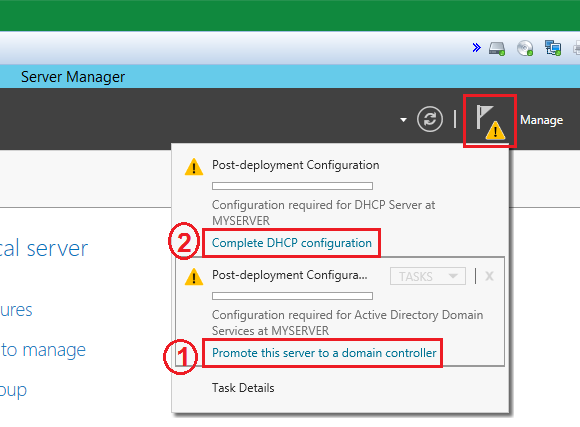
1.
Click on notification sign, select Promote This
Server to a Domain Controller.
2.
Click on Add New Forest.
3.
Fill out Root Domain Name (For example here:
test.local), then click Next.
4.
Fill out Password (the same as your
administrative privileges Password)
5.
Click Next 5 times, then click Install.
6.
Wait until process finished, click close. Sever
restart.
Configure DHCP
1.
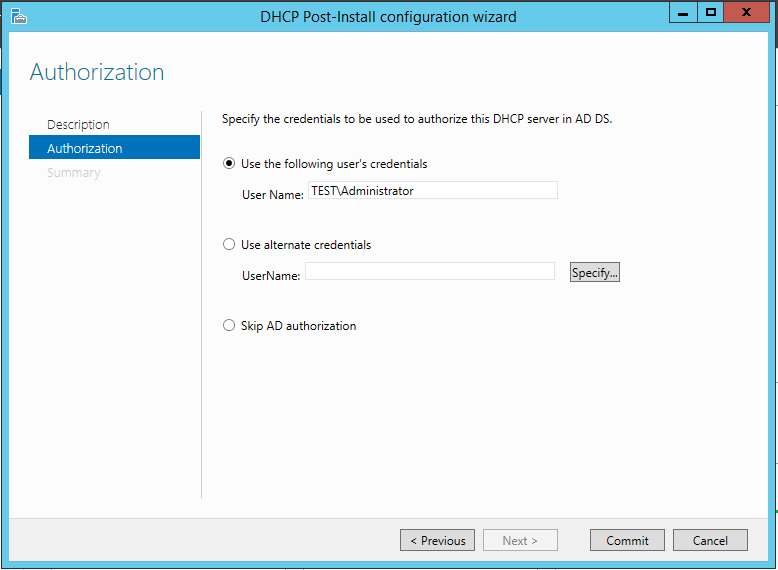
Click on notification sign, select Complete DHCP
Configuration.
2.
Click Next, then Click Commit. Then click Close.
 |
| - |
Next step to do is to create a new scope
 |
| - |
1.
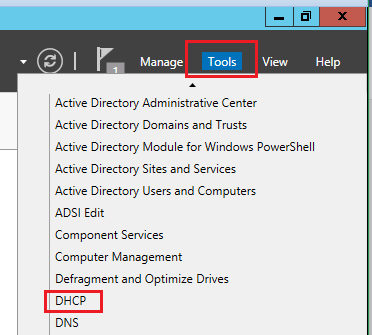
Click on Tool, then select DHCP.
2.
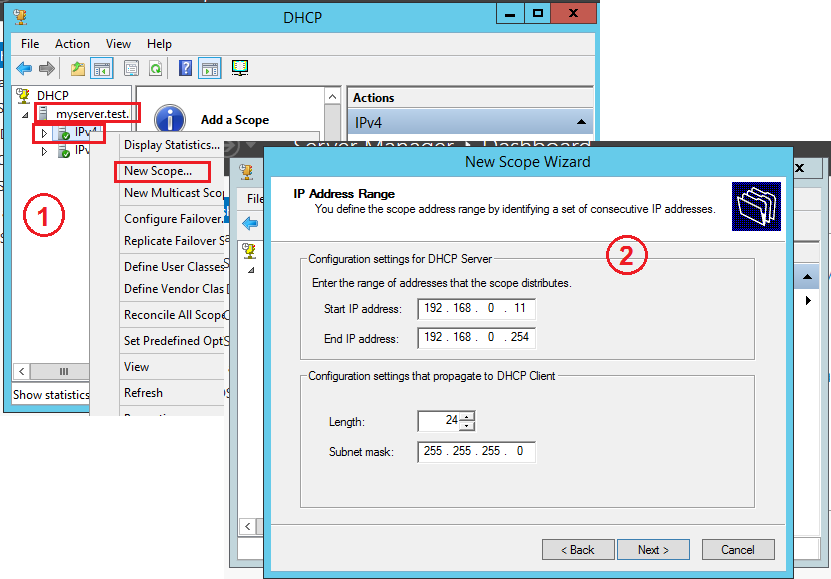
DHCP form showed, then expand server name.
3.
Right click on IPv4, select New Scope.
4.
Click Next, then fill out scope name and
description. Click Next.
5. Fill out Start and End IP Address (For example here: my IP static is
192.168.0.1, so I would fill, Start IP: 192.168.0.11 and End IP:
192.168.0.254). Click Next 8 times, then click Finish.
 |
| - |
After completing this, click
on Tool, then select Windows Deployment Service to start configure WDS
First thing to do is to Create
a new Disk Partition
1.
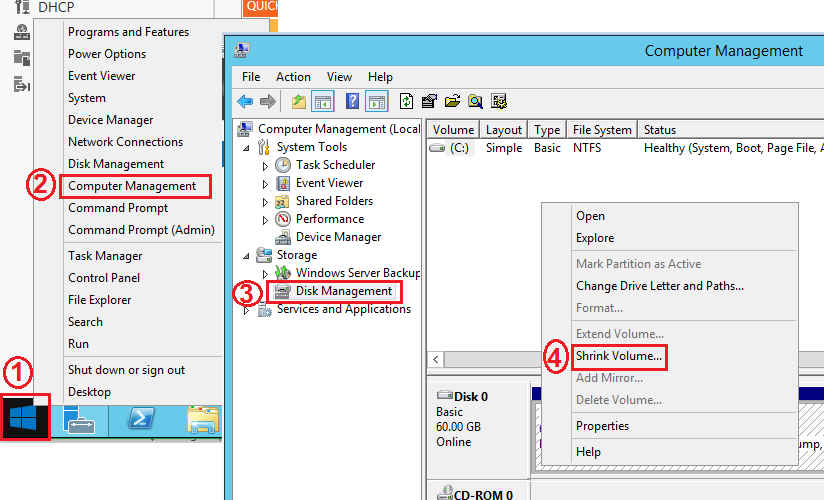
Right click on Window, select Computer
Management
2.
Click on Disk Management.
3.
Right click on Drive C, the select Shrink
Volume.
4.
Fill the amount disk size (For example here:
20000), then click Shrink.
5.
Right click on the Unallocated (Next to Drive
C), then click New Volume.
6.
Click Next 2 times.
7.
Choose Drive letter (For example here: E).
8.
Click Next 2 times. Click Finish.
 |
| - |
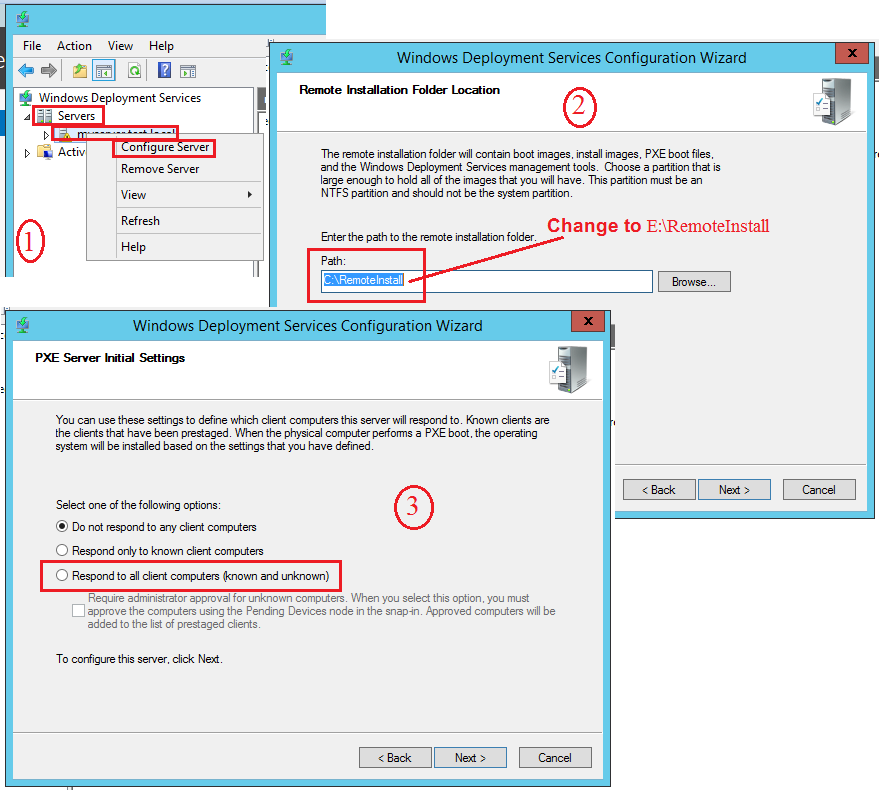
Configure Server
 |
| - |
1.
Expand server, right click on server name. Then
select Configure Server.
2.
Click Next 2 times.
3.
Browser server you are going to configure to the
partition you have just created (Drive E). Fill E:\RemoteInstall instead of C:\RemoteInstall.
4.
Click next 2 times.
5.
Select Respond to all Client Computers.
6.
Click Next. Then click Finish.
After complete this process,
what we need to do is to add Image.
There are two kinds of Images:
1.
Install Images
2.
Boot Images
Before you can add these two
images, you need to create USB bootable drive in order to get Install Images and
Boot Images.
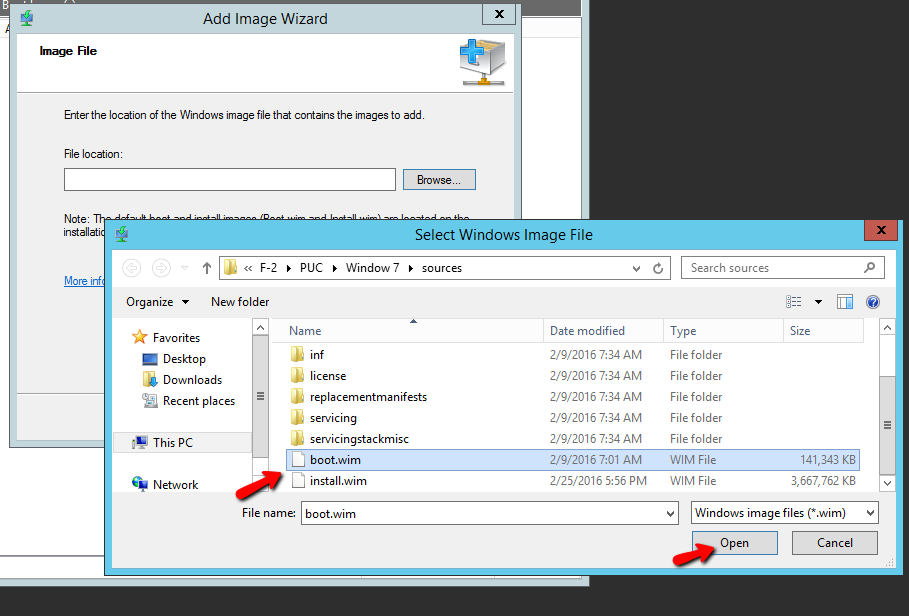
To add Install Image and Boot
Images, go WDS (Window Deployment Services) you have added.
Ø
Expand Server and then expand domain.
Ø
Right click on Install Image
Ø
Add Install Image…
Ø
Click next till you can browse to the file
you have created in your USB bootable drive within a folder called Sources.
Ø
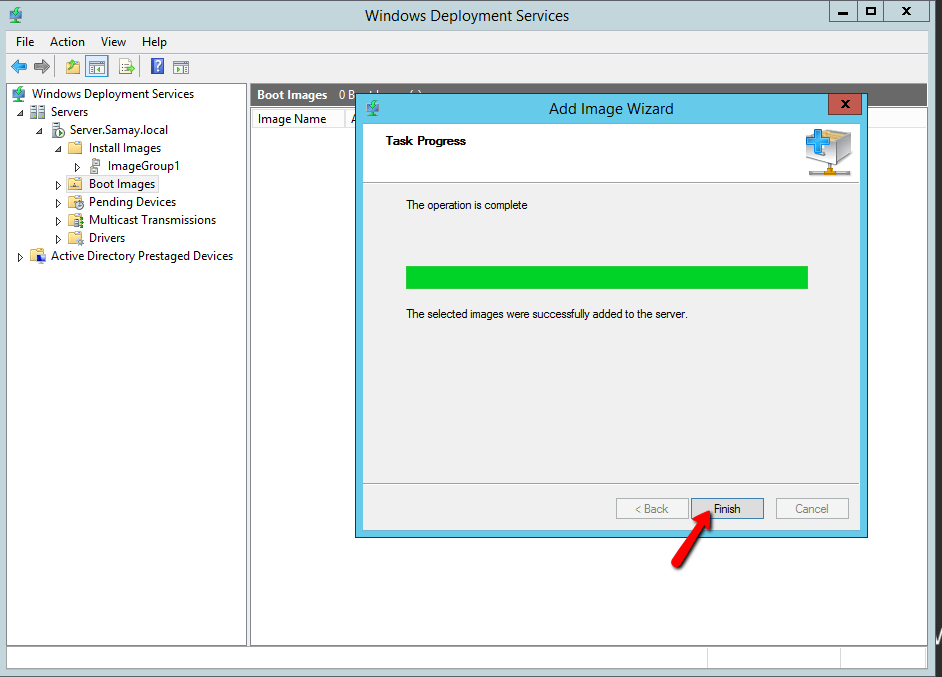
Right click on
Boot Images
Ø
Add Boot
Images…
Ø
Click next till you can browse to the file
you have created in your USB bootable drive within a folder called Sources
 |
| - |
 |
| - |
After you have completed Instal Images and Boot Images,
you’d better do Answer Files which allow you to install window clients automatically.
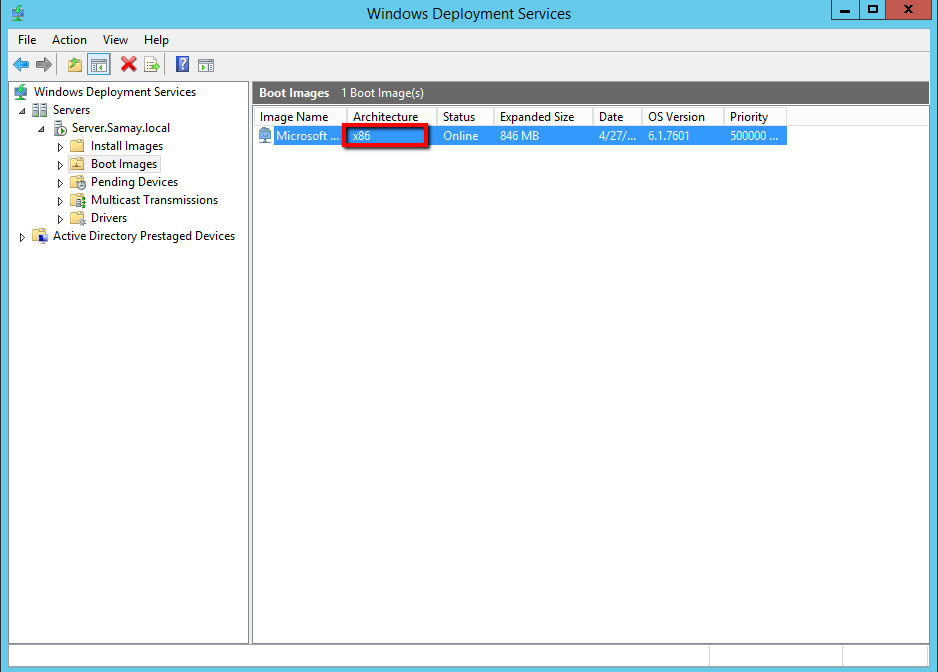
In order to do this Answer Files in the right way, you need to see your window
architecture whether it is x86 or x64 in Boot Image .
For example below:
 |
| - |
The picture above shows that the architecture is x86,
so you have to do Answer Files on x86. If the architecture is x64, you have to
do Answers Files on x64.
Note: The ways of doing Answer Files are the same whether
architecture is x86 or x64.
Here is how to do Answer Files step by step on x64:
1. Preparing WISM
for Unattended Deployment
The
use of Windows System Image Manager (WISM) is based on loading an operating
system image, the application will review the answers involved on the
deployment and we can set the answers as we need it.
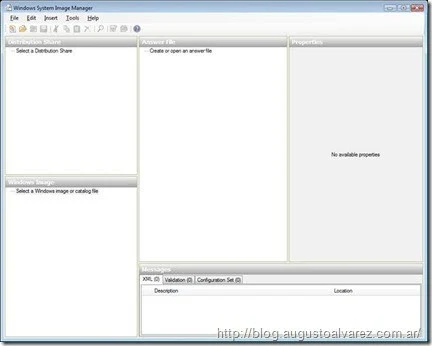
1.1
Open WSIM console, which you can find on WAIK program menu.
 |
| - |
1.2
Right click on select a distribution share, create new distribution
share.
This
will be the working folder.
 |
| - |
1.3
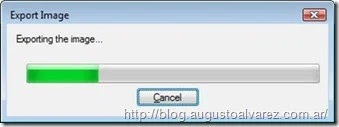
For WISM to work properly with the image, we’ll need to export it from WDS to
the distribution share.
To
export the image, we can access the WDS console, explore the “Install Images”
section, right click on the image and select “
Export”.
 |
| - |
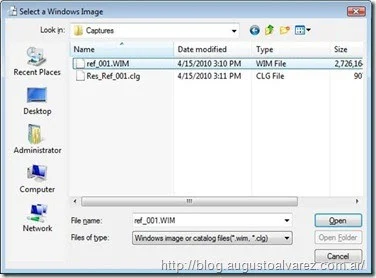
1.4
Now getting back to the WSIM console. Right click on “Windows Image”, and
select a “windows image”, then browse to “Dis share ref_001” and select the
image we exported earlier from the WDS console.
 |
| - |
1.5
Now WSIM will need to create a catalog file, so select yes at the next window.
 |
| - |
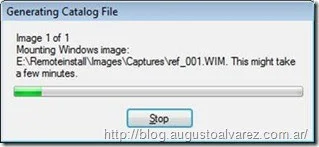
1.6
Now it will begin the catalog process, this will take more than a few minutes
depending on how big the WIM is.
 |
| - |
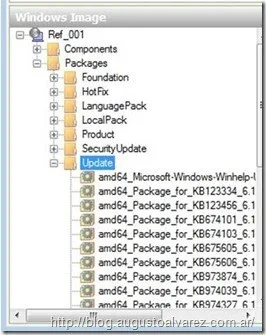
Now
you will see in the windows image panel components, and packages, in my case.
In the packages part you can choose to run certain updates, language packs,
hotfixes, and versions during the installation process of the OS. We are going to
focus only on unattended part of the WDS deploy.
 |
| - |
2. Creating the WDSClientUnattend.xml
Now
that we have our reference image loaded into WSIM, I am going to show you how
to create the unattended file for the first booting process. I will refer to
this file as WDSClientUnattend.xml. We will need to create two
.xml files for total automation. There are a few components we need to add for
the unattended pre install environment.
Here
are the things we are going to add.
- Regional – Language
settings during setup
- Domain credentials
- Create partition
- Modify partition
- Then validating the answer
file.
Setting
the regional-language
2.1
In the WSIM console look for the “Windows Image” pane, the expand components.
Since I am doing this on a 64 bit, will show that first. Browse to the “
windows-international-core-winpe”
node. Right click on this and select “
Add Setting to Pass 1
windowsPE”.
 |
| - |
2.2
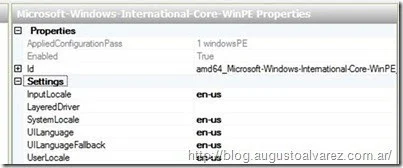
Now we’ll see this added to your answer file. Also look in the properties pane
right next to the answer file, and notice this is where we’ll make any changes
to the settings of each component you add. For this component we’ll add “
en-us”
to everything except “
layeredDriver”.
 |
| - |
The
“layeredDriver” is optional, and only used for Japanese and Korean keyboards.
2.3
Now we need to expand “windows-international-core-pe”, select “SetupUILanguage”,
then in the properties pane add “en-us” to the “UILanguage”.
Domain
Credentials
2.4
Browse to “
windows-setup\WindowsDeploymentServices” in the
components, then right click on “login”, and add this to
1 pass windowsPE.
Now expand login in the answer file pane, and select “credentials”. Now put in
your domain credentials for the network install.
 |
| - |
Create
Partition
2.5
Browse to “
windows-setup\WindowsDeploymentServices” then right
click on “
ImageSelection” and add to
1 pass windowsPE. Now select
install to in the answer file pane, then in properties set “
DiskID” to “
1”,
and “
PartitionID” to “
1” also.
 |
| - |
Modify
Partition
2.6
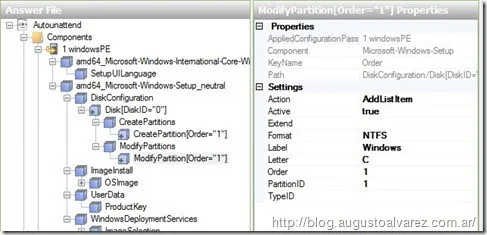
On the modify partition properties set “
active” to “
true”,
“
format” to “
NTFS”, “
label” to “
WINDOWS”,
“
letter” to “
C”, “
Order” to “
1”,
and “
PartitionID” to “
1”.
 |
| - |
Image
Selection
2.7
Add “
Microsoft-Windows-Setup\WindowsDeploymentServices\ImageSelection”
to your answer file. In the properties of “
installImage” add the file
name of the image we’ve captured, image group where we stored it in WDS, and
image name the way you have it setup in the WDS console.
 |
| - |
2.8
Next select “
InstallTo”, and set “
DiskID” to “
0”, and “
PartitionID”
to “
1”. This will install the image to disk 0, on partition 1.
 |
| - |
Validate
the answer file
2.9
To validate the answer file we can access to Tools, and selecting “Validate
Answer File”. In our case should not complete without any errors.
If
it does, you’ll see in the error description what went wrong.
2.10
Save the file as “WDSClientUnattend.xml” in the “E:\RemoteInstall\WdsClientUnattend”
folder created by WDS.
NOTE:
The
unattended file WDSClientUnattend must be associated to the WDS Server and not
to any particular image. If you are inserting a value in the Image you’ll be
deploying, that means every time you are using the PXE boot and contacting the
WDS Server, the image selection will be always the same.
So,
if we want to choose the image when the installation process starts, we must
remove “Microsoft-Windows-Setup\WindowsDeploymentServices\ImageSelection”
section from our answer file.
3. Adding the WDSClientUnattend.xml to the WDS server
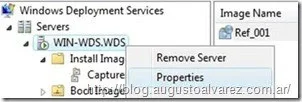
3.1
Open up the WDS console, and right click on your server and select
“Properties”.
 |
| - |
3.2
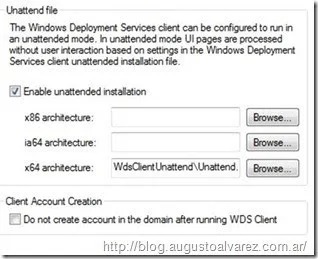
Click on the client tab, and check “
Enable unattended installation”
then browse for the “
WDSClientUnattend.xml” we created in the
previous step. Selecting the appropriate architecture.
 |
| - |
This
will automate the booting process in the deployment process. Now we need to
automate the OOBE which is the actual installation of the WIM.
4. Creating the OOBEunattend xml for Installation/OOBE
settings
This
is the second part which will unattended the actual installation of our
reference image, the OOBE part. This file I will be calling OOBEUnattend.xml.
I will show you how to:
- Set the computer name and
time zone
- Skip the EULA, and setup
network location
- Create a login, and set a
password
Computer
name and time zone
4.1
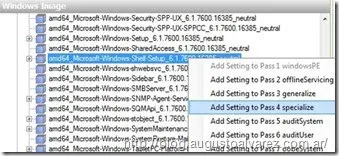
Open WISM console, then go to file, and open a new answer file. Browse to the
Components section and right click on “
Microsoft-Windows-Shell-Setup”
and select “
Add Setting to Pass 4 specialize”
 |
| - |
4.2
Here we want to configure the time zone, computer name (add an
asterisk * for random name), and any other settings we want to setup in the
properties pane.
4.3
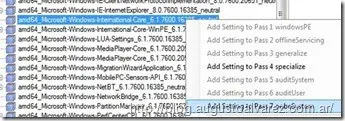
Now right click on “
Microsoft-Windows-International-Core” and
select “
Add Setting to Pass 7 oobeSystem”
 |
| - |
4.4
Now set everything to “
en-us” except for “
UIlanguageFallback”.
Leave that blank.
 |
| - |
Setup
Network location, and EULA skip
4.5
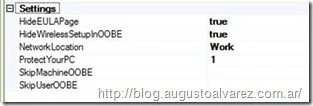
Find “
Microsoft-Windows-Shell-Setup” in the components, and add “
OOBE”
to “
Add Setting to Pass 7 oobeSystem”. Fill in the settings that you
want in the properties.
 |
| - |
Login
and password
4.6
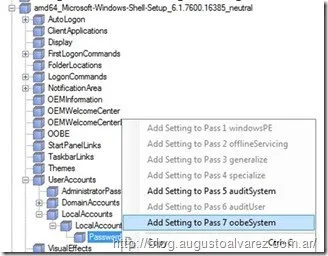
Browse to, and expand “
Microsoft-Windows-Shell-Setup”, expand “
UserAccounts”,
“
LocalAccounts”, “
LocalAccounts” again, then add “
password”
to “
Add Setting to Pass 7 oobeSystem”.
 |
| - |
4.7
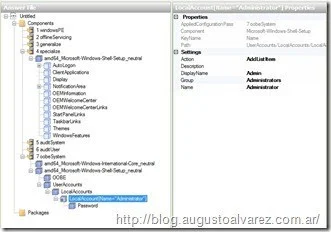
Click on “
LocalAccount” in the answer file, and add the
information in its properties.
 |
| - |
4.8
Then do the same for the password. Also feel free to play around with the shell
setup in the specialize part of the file for a more personal install.
Validate
and add to reference deploy image
4.9
Validate the answer file as mentioned before. And save the file to the folder
we’ve created for unattended images “E:\RemoteInstall\WdsClientUnattend”.
5. Associating OOBEUnattend.xml to the Install
Image
5.1
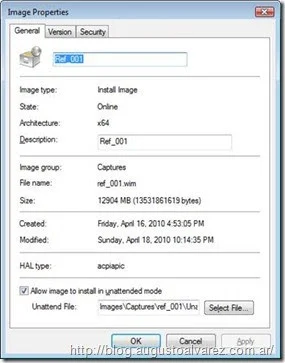
Open the WDS console and expand “install images”, click on “captures” then
right click on the image name “Ref_001”, and select properties.
5.2
At the bottom of the properties window we’ll see “
Allow image to install in
unattended mode” check that. Now browse for the file created in the step
above in “
E:\RemoteInstall\WdsClientUnattend”. Apply and select
ok.
 |
| - |
6. Deploying an unattended custom image with WDS
We
have everything in place now for a complete unattended deployment of Windows 7.
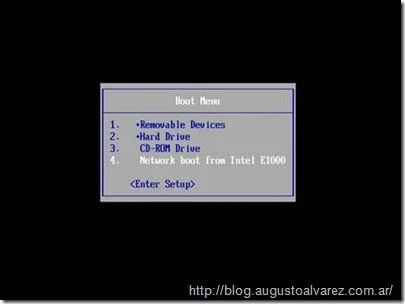
6.1
Boot up the computer with F12 for a network boot.
 |
| - |
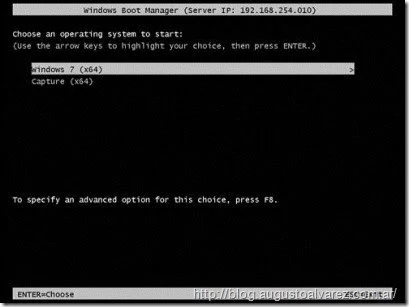
6.2
The computer will find your WDS server and ask you to hit F12, do so quickly or
you may miss it. Now select the boot image, “Windows 7 (x64)” in my case.
 |
| - |
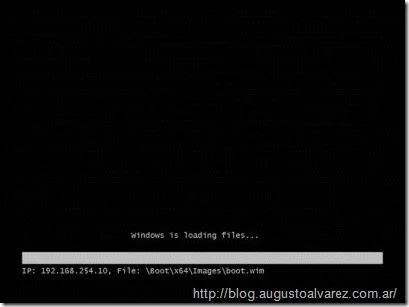
Windows
will load files after booting
 |
| - |
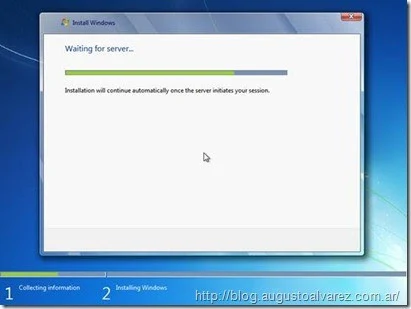
Since
the deployment will not require any user intervention, the next window
appearing should be this one.
 |
| - |
How to create
Capure Image
Ø Go to WDS again and double click on Boot Images
Now you have done one Capture Images of
Window 7 professional. In order to prevent any errors like picture bellow, you
have to do one Capture Image of Window10.
Now you need to add one more Boot Image of
Window 10 and do Capture Images with the
same way like illustration of Window 7
profession above.
Now we you get two Capture Images below.
After you run CapureImage win 10, you will
see this bellow.
After completing all the steps above, it’s
time to work on the process of Syprep in Window Clients. In your Window Client,
at least you have to install one apps( Firefox) in order to test it after you
upload your Window Client to your Window Server.
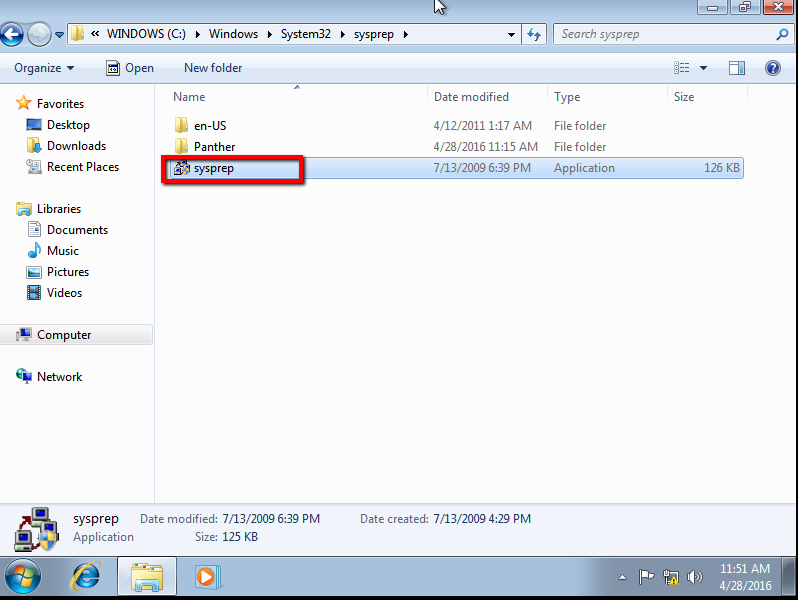
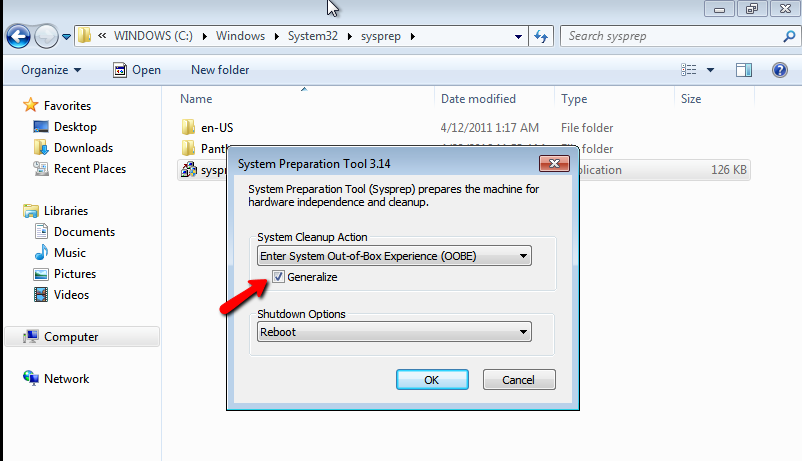
To Run Sysprep:
Ø Go to Local Disk(C):
Ø Double click on Windows
Ø Find System32 and double click on it
Ø Find Sysprep and double click on it and you will see:
 |
| - |
Ø Double click on Sysprep
 |
| - |
Ø Then click OK
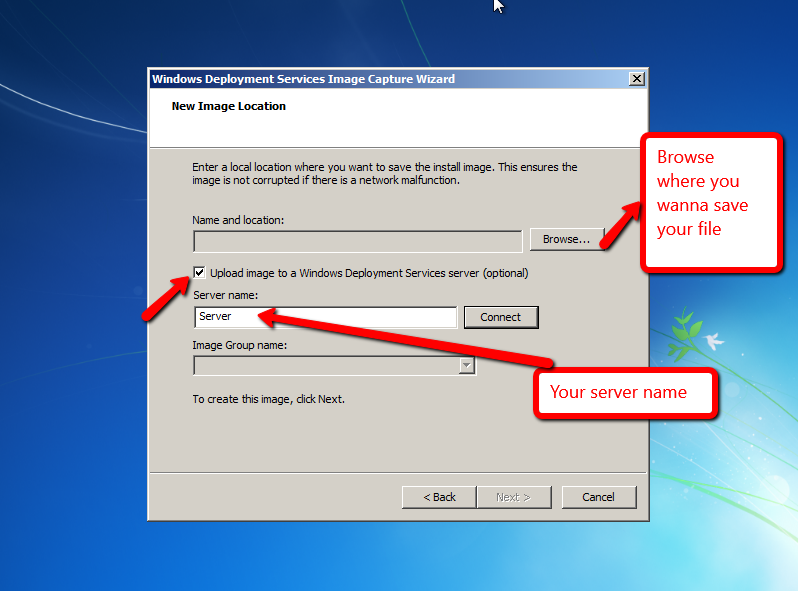
Ø At this time, you just keep calm and wait until the Reboot finish and carefully prepare to press F12 quickly. Then, you’ll
see:
Ø Click on Next
 |
| - |
Ø Then you click on Connect.
Now it’s done with your Capture Image.


![[feature]](https://blogger.googleusercontent.com/img/b/R29vZ2xl/AVvXsEgaOFwdxNB0K_WMLsYb_6nOwCv9Kg4ECcj2Mpg8Utv1IJ2vXFifDFtoEIUeGLTydXgcYU7LSE5l_BCPdAB_lDqJZob7HTj4PwW3elt2i25-6tOZlPTNkC2roBe_Yi_1a5V61wezHVYR8FOG/s1600-rw/1+Admin.png)


COMMENTS